the Creative Commons Attribution 4.0 License.
the Creative Commons Attribution 4.0 License.
Research on the micro and dynamic characteristics of combination surface based on fractal theory
Chunxia Zhu
Zhibiao Yan
The dynamic characteristics of the mechanical joint surface are important aspects of the dynamic theoretical analysis and optimization design of the machine tool. In this paper, the typical mechanical joint surface is taken as the research object. Through the combination of theoretical analysis and experimental analysis, the dynamic characteristics of typical joint surface parameters with different surface textures and the influence of texture parameters on the dynamic characteristics of the joint surface are studied. Based on the Hertz elastic contact theory and the contact fractal theory, the normal and tangential contact fractal models of the joint surface are derived, and then a mathematical model of the joint surface normal and tangential contact stiffness considering the domain expansion factor is established. The influence of surface texture parameters on the dynamic characteristics of the surface is further studied according to the model. In addition, the design of the experimental device and experimental scheme design are completed by the contact resonance method and the ERA algorithm, and the joint surface parameter identification experiment with texture is conducted. The normal and tangential frequency response functions of the joint surface, the dynamic characteristic parameters of the joint surface and the influence law of the joint surface parameters on the contact characteristics are obtained through the dynamic test analysis technology.
- Article
(3804 KB) - Full-text XML
- BibTeX
- EndNote
Mechanical structures and machines are widely used in the field of aerospace manufacturing and biomedical as important components, and these mechanical systems consist of many components containing joint surfaces according to specific requirements. Therefore, the dynamic characteristics of the joint surface not only has a decisive influence on the effectiveness of the constructed kinetics model, but also directly affects the service life of the mechanical structure. Hence, it has a very important impact on the dynamic performance of the entire mechanical structure. For instance, the contact stiffness on the joint surface of the machine tool accounts for 60 %–80 % of the rigidity of the whole machine (Wang et al., 2017; Mao et al., 2010; Pecorari and Rokhlin, 2007), which means about 60 %–80 % of the vibration problems on the machine tool result from the existence of the joint surface. The contact damping on the joint surface take up more than 90 % of the overall damping of the machine tool (Ma et al., 2014; Jaumouillé et al., 2010). Compared with the material damping of the component itself, the contact damping between the joint surfaces has obvious advantages. As explained above, it is necessary to establish a suitable mechanical dynamics model when performing dynamic analysis of the joint surface. In addition, in recent years, with the development of surface texture technology, the surface texture technology is used to process the micro-shape on the surface of the friction pair, which is used to improve the surface friction performance of the joint surface, and has attracted extensive attention from many scholars abroad. The technology improves the mechanical joint surface by adding texture to the joint surface of the mechanical structure, thus improving the contact stiffness and contact damping, which obtains an improved dynamic state of the mechanism system in the maximum space to achieve the required product performance (Zhao and Bai, 2011; Bruzzone et al., 2008).
Many scholars pay much attention to the contact stiffness and contact damping of the mechanical joint surface, for these two parameters has a great impact on the dynamic response of the mechanical system. In the study of mechanical contact dynamics, the joint surface can be simplified as one or more spring damping systems; the resistance to deformation of the joint surface as contact stiffness; the energy dissipation of the joint surface as contact damping. For the experimental study, Andrew, Thomley and others designed many experimental devices and experimental schemes, obtained a series of normal dynamic parameters between mechanical joints, and analyzed their dynamic characteristics (Andrew et al., 2010; Liang et al., 2013). Smallwood et al. (2000) studied the dynamic characteristics of the tangential direction of the mechanical joint surface by experimental methods. Based on the experimental data obtained, the conclusion was drawn that the damping is mainly aroused by hysteresis nonlinearity of tangential direction dynamic characteristics of the joint surface (Smallwood et al., 2000; Flores et al., 2006).
In theoretical research, J. A. Greenwood and J. B. P. P. Williamson used Gaussian distribution method to simulate the distribution law of micro-convex among the joint surface, and proposed a GW model based on single hypothesis (Greenwood and Williamson, 1996). However, since the premise assumptions in this model were independent mutually, they could only be applied under conditions of small load. Subsequently, D. J. Whitehouse and J. F. Archard studied the relationship between peak height of the contact surface micro-protrusions among the mechanical bonding surfaces and the curvature of the peak. Moreover, the joint distribution density was studied and WA model was proposed (Blossey, 2003; Hoffmann and Gaul, 2003). According to the GW and WA models, R. A. Oninn and J. F. Archard used WA to determine the separation relationship between contact area, load and surface, and the calculation results are consistent with GW, which is called OA model (Jackson, 2006; Fu et al., 2002). Majumdar and Bhushan used the method of geometric in mathematics to analyze the contact theory and proposed the fractal geometry basis surface model (Majumdar and Bhushan, 1991).
In addition, the so-called surface texture is to process a series of regular micro-textures (such as grooves, micro-pits, etc.) on the contact surface of the bonding surface, and the obtained surface has different physical properties from the previously smooth surface, Changing the physical properties of the bonding surface. It has been found that if the joint surface is textured on the friction pair, the frictional wear of the contact surface can be reduced. Etsion (2004) processed the micro-pit texture and applied it to the piston ring surface of the engine. It was found through experiments that the machined surface texture can reduce the friction coefficient between the piston ring surface and the cylinder liner by about 30 % (Etsion, 2004; Bechert et al., 2000). Ulrika Pettersson found that under lubrication conditions, when the surface texture is machined to different coated steel surfaces, the wear of the contact surface can be effectively reduced (Pettersson and Jacobson, 2003; Buczek et al., 2011). In addition, the texture has a certain influence on the wetting property of the contact surface, that is, when the specific micro-texture is processed on the surface, the contact angle of the surface of the droplet can be effectively changed, thus changing the hydrophilic and hydrophobic properties of the surface.
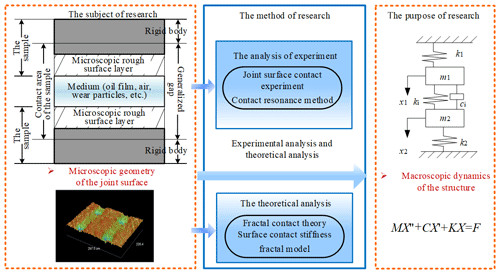
In this paper, the remaining section of this paper is organized as follows: In Sect. 2, the normal and tangential contact fractal models of the joint surface considering domain spreading factor are derived by Hertz elastic contact theory. And the mathematical model of the normal and tangential contact stiffness of the joint surface is established; In Sect. 3, the joint surface parameter identification experiment is carried out, and the design of the experimental program and experimental device are conducted through contact resonance method and ERA algorithm. Besides, the surface texture is processed by laser processing technology and the calibration of the experimental equipment is completed. In Sect. 4, the normal and tangential frequency response functions of the joint surface are obtained by analysis technology through dynamic test, and the dynamic characteristic parameters of the joint surface are identified. Then, the influence of bonding surface parameters on contact characteristics was also analyzed. Some conclusions are obtained in Sect. 5. And the logical structure of the paper is shown in Fig. 1.
2.1 Analysis of joint contact characteristics
At present, the analysis of the joint surface contact theory is mainly carried out from two aspects: the deformation analysis of micro-bonding surface and the equivalent parameter analysis of macro-bonding surface. The purpose is to establish a suitable joint surface dynamics model, and then the actual joint surface parameters is calculated by theoretical method to analyze the dynamic characteristics of the whole mechanism. However, the joint surfaces that are in contact with each other during the research process are not completely smooth and are affected by many factors, such as machining, friction and wear, and lubrication. Therefore, the mechanism of contact surface about contact stiffness and contact damping is analyzed based on the microscopic surface and deformation mechanism of the joint surface.
During the analysis, it was found that the micro-bonding surface is composed of many tiny protrusions, which are generally represented by using roughness and waviness in the machine. When the two surfaces are in contact, the actual contact area is smaller than the contact area of the outline due to the presence of peaks and troughs. When the pressure at the time of contact is increased, the contact surface begins to elastically deform, then it slowly is transformed into plastic deformation, and the actual contact area also is increased. Based on the Hertz elastic contact theory, the characteristics of microscopic dynamic are analyzed. In addition, some assumptions are considered. Which is each object is considered an elastomer and the load is applied to a small elliptical area of the surface. It is also assumed that the contact area on the contact surface is much smaller than the size of the object and the relative radius of curvature of the surface (Fang et al., 2008).
-
The surfaces are continuous and uncoordinated: a≪R; the effective size of the contact area is a; the relative radius of curvature of the surface is R;
-
Small strain: a≪R;
-
Each object can be regarded as an elastic half space: , a≪l; the effective radius of the two objects is R1, R2; the effective size of the horizontal and vertical directions of the object is l.
2.2 Establishment of micro-contact point distribution function and analysis of contact point deformation
Before analyzing and establishing the joint surface normalized contact stiffness fractal model and the tangential contact stiffness fractal model considering the influence of the domain expansion factor, the distribution function of the micro-convex is firstly obtained based on the surface fractal theory in the paper. Furthermore, the influence of the relevant parameters of the joint surface on the stiffness of the normal contact and the tangential contact stiffness is discussed by the established model analysis. When the contact point distribution function n(a) with contact area a is developed, the ratio of the maximum microcontact area al to the true contact area of the rough surface Ar is derived from n(a). And when the fractal dimension D→1 the ratio is . However, when D→1, the limit value of al∕Ar must be less than 1. Therefore, in order to more accurately reflect the ratio of al∕Ar when D→1, the size distribution function n(a′) of the contact point of the microcontact cross-sectional area a′ in the contact fractal theory is introduced in the paper. Its distribution function is as follows:
Where a′ is the micro-contact cross-sectional area; is the cross-sectional area of the largest contact point; ψ is the domain expansion factor of the micro-contact size distribution (ψ<1), the size of which is related to the fractal dimension D and is satisfied the transcendental equation;
When the value of D is tended to 1, the ψ value can be obtained:
In addition, when the value of D is tended to 2, the ψ value can be obtained:
2.3 Development and simulation of contact stiffness fractal model
The joint surfaces between the samples are generally obtained by machining, so the microscopic surface features are irregular. Therefore, in order to facilitate the study of the contact characteristics of the bonding surface, it is assumed that the contact surface is formed by two rough surfaces contacting each other. When the joint surface is subjected to the normal load, the micro-convex bodies of different cross-sectional areas are pressed against each other, and different deformations are generated. As shown in Fig. 2a, from the microscopic point of view, the micro-convex body with large cross-sectional area is elastically deformed, and the elastic strain energy is stored without consuming energy. The ability to resist deformation is measured by the contact equivalent stiffness Kn. When the cross-sectional area is smaller, the micro-convex is underwent plastic deformation under pressure, consuming system energy, and the contact damping Cn is used to characterize the energy dissipation rate (Arghir et al., 2007; Eisenstein et al., 2011; Zhang et al., 2012).
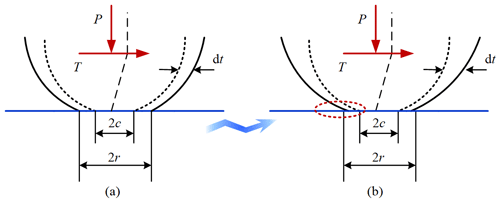
In addition to elastic and plastic deformation in the normal direction, tangential deformation and energy loss are generated due to the tangential extrusion and slip of the micro-protrusions. As shown in Fig. 2b, when the joint surface is subjected to both normal and tangential loads, the microscopic and macroscopic slip between the contact surfaces and the micro-convex extrusion deformation are the main causes of system energy loss (Abad et al., 2012). The damping coefficient Cr is represented the energy loss capability. Among them, when the joint surface is composed of materials with different stiffness, Cr is mainly related to plastic deformation and micro-slip (Mi et al., 2012; Shafiei and Alpas, 2009); the tangential equivalent stiffness Kr is used to characterize the resistance to tangential deformation.

Figure 2Schematic diagram of contact surface. (a) The diagram of normal contact. (b) The diagram of tangential contact.
2.3.1 Development of fractal model of normal contact stiffness
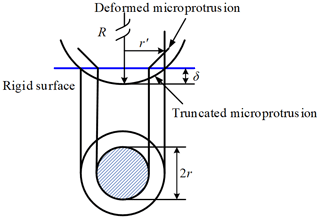
The joint surface is essentially composed of two rough surfaces. Its model can be simplified to a rough surface in contact with a real plane. For a single micro-protrusion on a rough surface, it can be equivalent to a sphere of radius R, as shown in Fig. 3.
When the sphere is in contact with the rigid ideal plane under the action of the normal load p, the normal contact deformation δ is generated. If the radius of the contact area is r, then the following relationship is developed:
Where E1 and E2 are the elastic moduli of the two elastomers in Fig. 3; v1 and v2 are the Poisson's ratio of the two elastomers respectively; and E is the composite elastic modulus of the two contact materials. According to Eqs. (5) and (6), the normal contact stiffness of a single micro-protrusion in contact with a plane can be expressed as:
For a circular contact area, the contact area a can be expressed as:
Therefore, the Eq. (10) can be further obtained:
In addition, based on , the normal contact stiffness Kn of the joint surface can be obtained:
Where is the critical microcontact cross-sectional area.
Further, the normal contact stiffness kn of the single micro-protrusion in contact with the rigid plane can be expressed as:
The Eq. (13) can be further obtained:
According to the relationship between the actual contact area a of the contact point and the cross-sectional area a′, i.e., , the normal contact stiffness Kn of the joint surface can be obtained:
By dimensionless processing of Eq. (14), the dimensionless normal contact stiffness can be obtained as:
Where, , , , , .
Therefore, Eq. (15) is the fractal model of the joint contact normal stiffness affected by the domain expansion factor ψ. Where Aa is the nominal contact area; is the dimensionless true contact area; is the dimensionless critical contact area; G∗ is the dimensionless feature length scale parameter.
In addition, according to the radius R of curvature of the tip end of the micro-protrusion and the deformation of the micro-protrusion having the sectional area a′, the relationship between the sectional area a′ of the elastic contact point and the normal elastic contact load pe is obtained as follows:
The relationship between the cross-sectional area a′ of the plastic contact point and the normal plastic contact load pp is satisfied:
Where (H is the hardness of the softer material; σy is the yield strength of the softer material). Therefore, the relationship between the total surface load P and the true contact area of the joint surface is satisfied:
Where, ; and Ar is the true contact area.
When D is satisfied the following relationship, i.e., , D≠1.5:
In addition, When D is satisfied the following relationship, i.e., D=1.5:
Since ac is constant for a determined rough surface, the normal total load P is depended on the actual contact area al of the maximum contact point. Therefore, the relationship between the normal load P and the true contact area Ar is obtained. According to Eqs. (23) and (24), and the dimensionless normal total load P∗ acting on the joint surface is obtained by dimensionless processing:
D≠1.5:
D=1.5:
Where, , , .
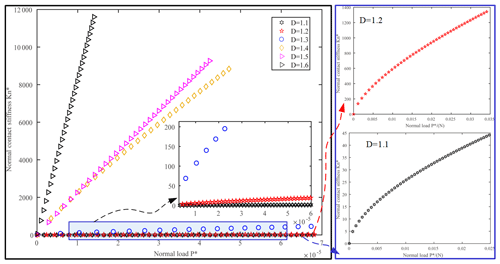
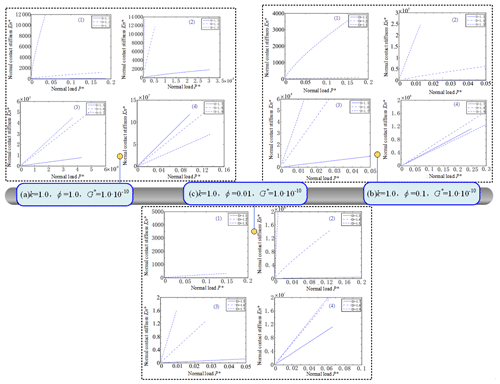
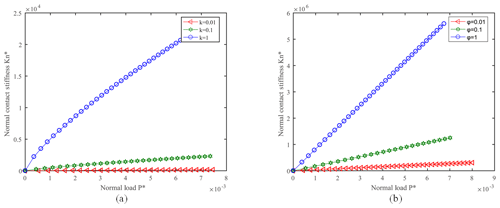
Therefore, the dimensionless normal total load considering the influence of the domain spread factor ψ of the microcontact size distribution is also obtained. Since both and P∗ are functions of , the nonlinear implicit function relationship between and P∗ is developed. And the results of simulation are shown in Figs. 4–7.
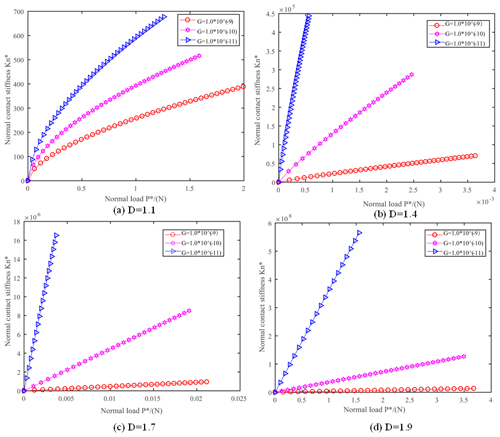
Figure 6Effects of fractal characteristic length scale parameter G∗ on normal contact stiffness (k=1.0, ϕ=1.0).
The dimensionless normal contact stiffness of the joint surface is increased with the increase of the dimensionless normal total load P, as shown in Fig. 4. Moreover, the range of fractal dimension is D=1.1–1.6, the linear relationship between and P is obvious, as shown in Fig. 4a. And when the normal load of the joint surface is increased, it is beneficial to increase the normal contact stiffness of the joint surface. When the following relationship is satisfied, i.e., ϕ=0.01, ϕ=0.1 and ϕ=1.0, and the range of fractal dimension is D=1.1–1.7, the dimensionless contact stiffness of the joint surface is increased with the increase of the fractal dimension D of the joint surface, as shown in Fig. 5a, b, c. However, when ϕ=1.0, D>1.7 (Fig. 5a4) and ϕ=0.1, D>1.8 (Fig. 5b4), is decreased with the increase of the fractal dimension D. The dimensionless normal contact stiffness of the joint surface is decreased with the increase of the dimensionless fractal dimension length parameter G∗ of the joint surface, as shown in Fig. 6. Since the dimensionless fractal dimension length parameter G∗ is reduced, it means that the surface roughness is reduced. Therefore, it can be seen that when the surface roughness of the bonding surface is reduced, it is advantageous for improving the normal contact stiffness of the bonding surface. In addition, the dimensionless normal contact stiffness of the joint surface is increased with the increase of k, as shown in Fig. 7a. This is because when k is increased, then is also decreased, so that the percentage of elastic contact between the bonding faces is increased. The dimensionless normal contact stiffness of the joint surface increases with the increase of ϕ, as shown in Fig. 7b. This is because the ϕ is increased to improve the yield strength of the softer material. And when the yield strength of the material is increased, it is known from that is decreased, resulting in an increase in the percentage of elastic contact between the bonding faces.
2.3.2 Development of fractal model of tangential contact stiffness
As can be seen from the analysis in the previous section, when it is not subjected to the load or when the two are subjected to the load p in the normal direction of the contact point, the contact state is as shown in Fig. 3. However, when the tangential force t is applied in the x direction, a tangential deformation dt is occurred, as shown in Fig. 8.
At this time, the relationship between the tangential force t and the tangential deformation dt can be expressed as:
When a single micro-protrusion is in contact with a plane, the tangential contact stiffness kt can be expressed as:
Where , v and μ are the equivalent shear modulus, Poisson's ratio and friction coefficient of the two contact materials of the bonding surface, respectively. In addition, , and the contact area a of the contact area can be expressed, i.e., a=πr2.
Therefore, the tangential contact stiffness kt can be obtained,
According to the theoretical analysis, the tangential contact stiffness kt is related to the normal load p, the tangential load t and the contact area a; and only when, , the tangential contact stiffness is present; when, . A relative slip is occurred.
For the sake of research, the following assumptions are made here:
-
The microscopic morphology of the rough surface is isotropic;
-
The interaction between the micro-protrusions on the rough surface is ignored;
-
The force received by the micro-protrusion is proportional to the size of its contact surface.
According to the above assumption, the relationship between the tangential force Tμ on the unit contact area and the actual contact area Ar of the joint surface and the tangential force T acting on the entire joint surface is satisfied:
Therefore, the tangential force t acting on the contact area a is satisfied:
The normal force p acting on the contact area a is satisfied:
In the Eq. (32), P is a normal force acting on the entire bonding surface.
Considering that the micro-convex body that has undergone plastic deformation has been plastically flowed due to the local contact load, it isn't able to continue to bear the tangential load. Therefore, when the tangential stiffness of the mechanical joint surface is calculated, it is not included the plastic deformation of the micro-protrusions that has occurred. While the micro-protrusions that do not reach the elastic limit, it can continue to withstand the tangential load, thereby contributing to the tangential contact stiffness of the bond faces.
Based on the Eq. (1) of the microcontact sectional area distribution function n(a′) and the Eq. (28), the tangential contact stiffness of the joint surface can be expressed as:
Where, the following relationship is satisfied, i.e., ,
Therefore, the Eq. (36) can be further obtained:
By dimensionless processing Eq. (36), the dimensionless tangential contact stiffness can be obtained as:
Where, ; Eq. (37) is a fractal model that combines the tangential contact stiffness of a surface considering the influence of the domain expansion factor ψ of the microcontact size distribution.
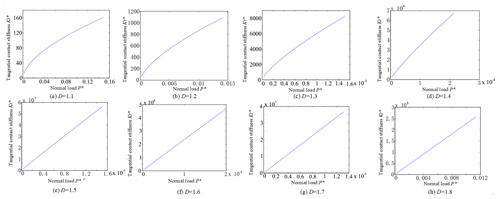
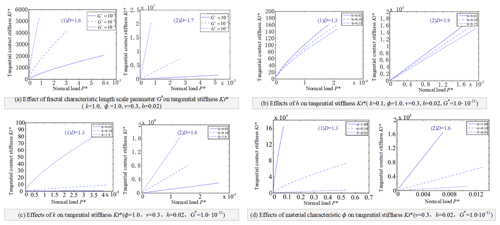
Based on the above analysis, the tangential contact stiffness Kt of the joint surface and the normal force P acting on the joint surface and the performance parameters of the joint surface material (such as hardness H, yield strength σy, equivalent elastic modulus E, equivalent shear Modulus etc.) are established. And the complex nonlinear relationship between the fractal dimension D and the fractal roughness G of the joint surface is also developed, thus a fractal model of the tangential contact stiffness is developed. And the dimensionless normal total load P∗ and dimensionless tangential contact stiffness can be calculated, as shown in Figs. 9–11.
The simulation results are shown that the dimensionless tangential contact stiffness of the joint increases with the increase of the dimensionless tangential total load. Moreover, when the range of fractal dimension is D=1.1–1.3, the nonlinear relationship between and P is very obvious. when fractal dimension is D>1.4, the relationship between and P is nearly to linear. When the normal load of the joint surface is increased, it is beneficial to increase the tangential contact stiffness of the joint surface. And when k=1.0, k=0.1 and k=0.01 are taken respectively, ϕ=1.0, ϕ=0.1 and ϕ=0.01 are respectively taken; and the fractal dimension D=1.1–1.7 is used, the dimensionless tangential contact stiffness of the joint surface is increased with the increase of the fractal dimension of the joint surface. In addition, the dimensionless tangential contact stiffness of the joint surface is decreased with the increase of the dimension parameter of the dimensionless fractal feature of the joint surface. Since it means that the surface roughness is reduced, it can be seen that when the surface roughness of the joint surface is reduced, it is advantageous for improving the tangential contact stiffness of the joint surface. And the dimensionless tangential contact stiffness of the joint surface is increased with the increase of k. This is because that as the value of k is increased, the value of is decreased, thereby the percentage of elastic contact between the bonding faces is increased.
The contact stiffness and contact damping of the mechanical joint have a great influence on the dynamic characteristics of the machine. However, most of the current research is that the contact stiffness and contact damping of the bonding surface are controlled by selecting materials. There is little research on the contact stiffness and contact damping that the bonding surface can be affected by the surface texture. Therefore, the influence of texture on the contact stiffness and contact damping of the joint surface is analyzed through experiments in the paper, and then the method of controlling the contact stiffness and damping of the joint surface is explored by texture. The contact resonance method is used to measure the contact stiffness and contact damping of the bonding surface during the experiment, that is, the method of introducing the contact parameters according to the contact resonance. The specific process is that it is given the preload, and then mechanical bonding part is given by an exciting force, the contact stiffness of the bonding surface corresponds to a contact frequency, which can be displayed by the vibration spectrum obtained by Labview. And the algorithm of ERA eigenvalue is used to identify the signal generated by the excitation force on the vibration of the joint surface, and the contact frequency and corresponding damping under the excitation force can be obtained, and then the contact stiffness is obtained by reverse thrust.
According to the experimental device, the test piece is simplified into the upper test piece m1 and the lower test piece m2, and the joint surface is equivalent by a spring and a damper. The experimental research object is shown in Fig. 12a. The vibration equation of the system is easily derived from the simplified model of the system:
The characteristic equation is further obtained:
Therefore, the relationship between contact stiffness and contact frequency is obtained:
In the data processing, the ERA eigenvalue implementation algorithm is used to identify the acceleration signal generated by the vibration, and then the contact frequency and the corresponding contact damping can be obtained. The contact stiffness is derived from the contact frequency and Eq. (41).
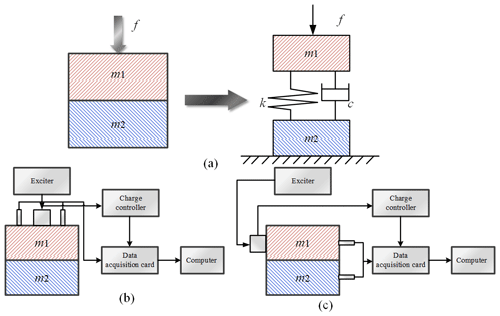
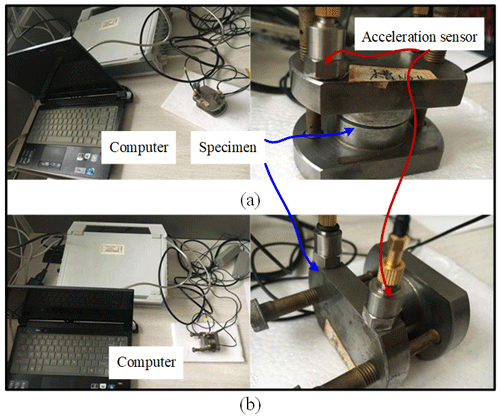
Figure 12(a) Normal experimental study and dynamic model of normal experiment. (b) Normal parameter identification test system. (c) Cutting parameter identification experiment system.
According to the experimental principle, the excitation signal is input through the data acquisition card in the computer, and the excitation force is applied to the bonding surface through the amplification of the power amplifier. The acceleration signal of the test piece is measured by two acceleration sensors, and the exciting force applied to the joint surface is measured by the force sensor. The test signals obtained by the force sensor and the acceleration sensor are conditioned by the charge adaptor, then transmitted to the data acquisition card, and then transmitted to the computer. According to the above experimental principle, the ERA eigenvalue algorithm is used to identify the contact of the joint surface of stiffness and damping. The normal parameter identification system is shown in Fig. 12b. The experimental test system combined with the face tangential direction is basically the same as the normal direction, as shown in Fig. 12c.
In addition, this experiment is mainly for the experimental analysis of experimental specimens. The purpose of the experiment is to analyze the main influencing factors (including material properties, processing methods, surface roughness and joint texture size) under the external factors (additional load and intermediate medium). And the main analysis object is the joint part of the test piece. In order to avoid the influence of the added external quality on the dynamic performance of the combined interview part, the test accuracy is increased, and the interview part is placed on the vibration isolation table by bolt fixing installation, and the excitation device is excited by a force hammer with a force sensor, then the excitation signal is collected by the data acquisition card through the acceleration sensor.
3.1 Experimental equipment
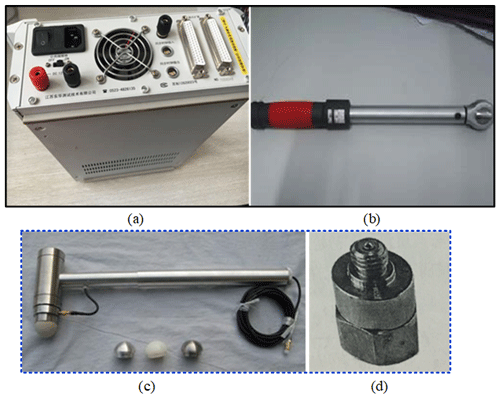
In this experiment, the pulse excitation method is used to apply the exciting force to the test piece first, and then the vibration is measured. A hammer with a force sensor can emit an exciting force, and the vibration signal can be received by a sensor that is magnetically attracted to the test piece. The measurement signal is subjected to FFT transformation in the analyzer, and the contact parameters of the bonding surface can be obtained according to the solution frequency response function. The selected experimental equipment is as shown in Table 1 and Fig. 13. Data acquisition card NI USB-6009, Dynamic test analyzer DH5922, Acceleration sensor CQV9345, Charge controller DH5857, Excitation hammer B&K, Force sensor, Torque wrench.
In this experiment, the frequency range is between 0 and 1800 Hz according to the designed test piece. Therefore, this paper uses a hammer with a rubber hammer to meet the requirements of the excitation force is used in the paper.
In addition to this, it is considered that the shaking of the device can be occurred during the excitation in the experiment. Therefore, in order to avoid this situation during signal acquisition and processing, the AC586 acceleration sensors for data acquisition is used. The two acceleration sensors are attached to the other end of the untextured smooth surface. Each time a set of experiments is completed, the data collected are averaged to ensure the accuracy of the experiment. The appropriate amount of beeswax is applied to the other end surface of the smooth non-textured surface, and the sensor is pressed on the surface. To ensure that the sensor does not fall off during the experiment, the sensor is onto the beeswax. The sampling frequency is 120 KHz. The collected data is mathematically converted into acceleration.
3.2 The design of experimental parameter
The purpose of this paper is to test and compare the contact stiffness and contact damping with load in the normal and tangential specimens of different surface textures. Therefore, before processing the texture, some factors are considered, such as the size of the load, the shape of the test piece, the type of surface texture and its size.
The designed textured and tangential specimens are connected by pre-tightening bolts. In this paper, the experimental specimen is designed into a step shape, the surface texture is machined on the surface of the small round table above, and the bolt holes are machined on the steps. In consideration of the rust prevention and the fineness requirements in processing the surface texture, the material used for the processing of the test piece is 45# steel. The textures processed at the contact surface herein are groove texture and micro-pit texture, as shown in Fig. 14.
In the Table 2, D, h, L are shown in Fig. 14a as the width of the micro-pits, the depth of the micro-pits, and the spacing between the center points of the micro-pits. Among them, the test piece A is a smooth surface without texture, and the surface is subjected to fine grinding treatment. The micro-pit texture designed in this paper is laser-machined because of its small size. The surface morphology of the micro-pit texture obtained by laser processing is shown in Fig. 14a.
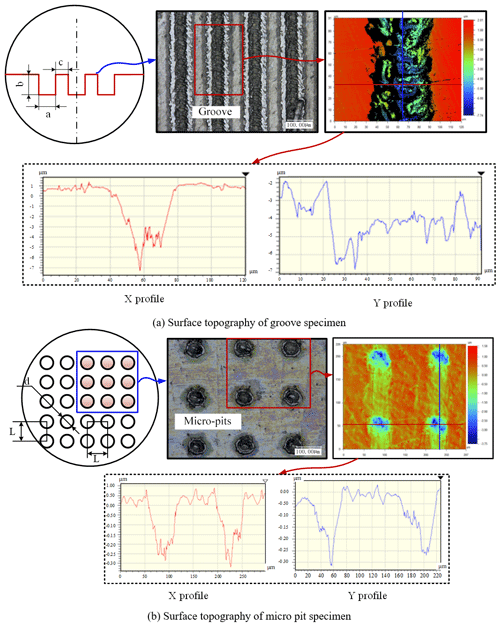
Figure 14Surface topography of specimen. (a) Surface topography of groove specimen. (b) Surface topography of micro pit specimen.
Table 2Parameter of the normal and the tangential experimental specimen of the groove (A, B1, B2, B3, C1, C2, C3, E1, E2, E3) and the micro-pits (A, b1, b2, b3, c1, c2, c3, e1, e2, e3).

NA: not available
In Table 2, D, h, L are respectively expressed as the width of the groove, the depth of the groove, and the spacing between the center points of the groove, as shown in Fig. 14b. Among them, the test piece A is a smooth surface without texture, and the surface is subjected to fine grinding treatment. The groove texture designed in this paper is laser-machined because of its small size. The surface texture of the groove obtained by laser processing is shown in Fig. 14b. In the above Table 2, is the ratio of the area of the groove textured portion of the upper surface to the total area. Among them, the sixth column of Ra directly measured the textured test piece by a three-dimensional contour scanner. According to the research situation, the diameter of the groove texture is designed in increasing order of 40, 60, 80 µm. In this paper, the surface real shape, actual size and roughness of all the tested specimens were tested. The data in Table 2 above is the actual size measured by the 3-D profiler. In the above Table 2, is the ratio of the area of the micro-pit texture convex portion of the upper surface to the total area. Among them, the Ra of the last column is directly measured by a three-dimensional contour scanner. According to the research situation, the diameter of the micro-pit texture is designed in increasing order of 40, 60, 80 µm.
This experiment is designed as the surface texture effect of the joint surface when adding lubricating oil to the surface. The lubricating oil parameters are as follows. The style is Mobil Super HP: 5W-30; SAE Viscosity grade is 5W-30; CST@40 ∘C is 61; CST @100 ∘C is 10.4; Phosphorous is 0.078; Specific Gravity is 0.87; flash point (∘C) is 221; pour point (∘C) is −36.
In this paper, the contact parameters obtained when the surface textured surface is in contact with the smooth and non-textured surface are studied. Therefore, 9 sets of experiments are performed in the normal direction and the tangential direction respectively, in the case of lubrication and no lubrication, a contact experiment with a textured surface and a smooth with non-textured surface.
The main parameters are included: the size of the texture, the normal excitation force and the tangential excitation force, lubricating oil and other parameters. The specific dimensional design and processing of the textures studied herein were listed above. The normal excitation force is 10, 20, 30, 40 N, and the tangential excitation force is 5, 10, 15, 20 N. The experiment is shown in Fig. 15.
4.1 Spectrum analysis of acceleration signals
The vibration acceleration signal obtained by the experiment is decomposed by the Fourier transform method to become a function of frequency, and then the signal is analyzed and processed in the frequency domain. In this paper, the spectrum analysis is used to perform Fourier transform on the acceleration signal to obtain the amplitude map. And the acceleration sensor is used to collect and measure the acceleration signal and use the relevant program in the software to obtain the contact stiffness and contact damping of the joint surface. The measured contact stiffness corresponds to a contact resonant frequency on the amplitude map. There are generally two peaks in the processed spectrum. These two peaks are the system frequency and the contact frequency, as shown in Fig. 16.
As shown in Fig. 16, the processed spectrum analysis of a smooth, non-textured test piece is shown, which is given a 30 N excitation force in the normal direction. It can be seen from the acceleration signal diagram that the magnitude of the acceleration gradually is decreased with the time, and the maximum value of the acceleration can reach 0.19 m s−2. In the spectrogram, the system frequency is about 780 Hz, and the contact resonance frequency is about 1530 Hz.
4.2 Influence of surface texture on normal contact parameters
4.2.1 Influence of texture size on normal contact parameters
In this paper, the surface texture of the experiment is processed to study the influence of the texture size on the contact stiffness of the joint surface. The processed texture specimens are shown in Table 2.
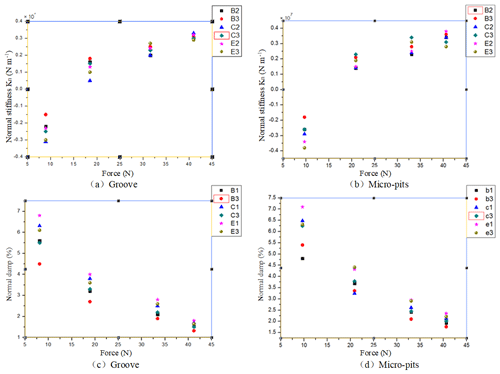
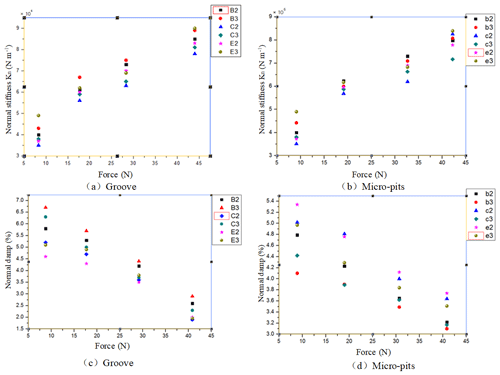
Figure 17(a, b) The impact of texture on the normal stiffness (groove and micro-pits). (c, d) The impact of texture on the normal damp (groove and micro-pits).
Firstly, it can be seen from Fig. 18 that the size of the texture has a very significant effect on the contact stiffness of the bonding surface. When the load is relatively small (such as 5 N in this paper), the contact stiffness of the joint surface is greatly increased whether it is a grooved textured test piece or a micro-pitted textured test piece. However, when the normal excitation force is gradually increased, the influence of the texture on the contact stiffness of the joint surface becomes more complicated, and the contact stiffness of the joint surface is greatly increased. In addition, with the increase of the applied normal load, the influence of the groove texture on the contact stiffness of the joint surface and the influence of the micro-pit texture on the contact stiffness of the joint surface are consistent, but the magnitude of the change is not uniform. When the exciting force is increased, the influence of the groove texture on the contact stiffness of the joint surface is increased compared to the smooth untextured surface, and the influence of the micro-pit texture on the contact stiffness of the joint surface is smoother than that of the smooth surface. The textured surface is also increased, but the growth trend is slightly reduced compared to the groove texture.
When the roughness of the specimens with surface texture is relatively close, their contact stiffness is compared. From the case where the contact stiffness of several specimens with similar roughness in the groove texture and the micro-pit texture changes with the load, it can be seen that as the ratio of the area of the textured portion of the textured surface to the total area is changed, the effect of texture on the contact stiffness also is changed. When the ratio of the convex portion of the test piece to the total area reached 90 %, the contact stiffness was not changed much compared with the smooth test piece. However, when this ratio continues to decrease to 75 %, the contact stiffness of the test piece is improved to some extent. When the ratio of the projections to the total area is reduced to 60 %, the change in the contact stiffness begins to slow down. This situation is caused by the pressure of the contact surface and the actual contact area. When the texture is formed, the actual contact area becomes small, and the pressure of the contact surface becomes large. When the actual area is large, the joint contact stiffness increases with the increase of pressure. However, when the texture size on the bonding surface is too large, the actual contact area of the bonding surface is largely reduced, and the contact area is reduced, resulting in a decrease in the ability of the bonding surface to resist deformation, and resulting in a decrease in the contact rigidity of the bonding surface. The above findings indicate that the influence of the existence of the texture on the contact surface contact stiffness has a great relationship with the size of the texture, so the contact stiffness of the joint surface is improved by selecting the proper size.
For the analysis of the damping ratio, the ERA algorithm is used to obtain the change of the contact damping ratio of the bonding surface with the normal excitation force under different texture conditions, as shown in Fig. 17c–d.
The result of contact damping measured when the test piece with the groove texture and the micro-pit texture is in contact with the smooth test piece, respectively. It can be seen from the figure that whether the groove texture or the pit texture, the contact damping of the bonding surface is increased first and then is decreased with the increase of the normal excitation force. Compared with the previous research results, it is found that the cause of this phenomenon is that the exciting force acts on the bonding surface to cause the bonding surface vibration, causing the micro-protrusions on the bonding surface to vibrate together, and the micro-convex on the surface is combined with the increase of the exciting force. The larger the deformation, the more micro-protrusions that participate in the contact, making the energy less dissipative.
Theoretically, the contact area of the bonding surface is reduced due to the existence of the texture, so that the micro-protrusions in contact with the bonding surface are reduced, the energy is dissipated faster, and the contact damping is increased. However, the experimental data analysis did not find this effect. The possible reason is that although the texture causes the number of micro-bumps of the contact surface to decrease, the contact pressure of the bonding surface is also increased in this case. The coupling effect of the two is such that the influence of the texture on the contact damping is not obvious. In summary, the contact damping decreases with the increase of the exciting force, but the influence of the presence or absence of the surface texture on the contact damping is not significant.
4.2.2 Influence of exciting force on normal contact parameters
Figure 18 is shown the changes of contact stiffness and contact damping under the action of exciting force on the surface of the grooved texture and the surface of the micro-pit texture. It can be seen from the Fig. 18 that the influence of the exciting force on the contact stiffness is obvious for both the groove texture and the micro-pit texture. The contact stiffness is increased with the increase of the force, and the contact damping is decreased with the increase of the force. The reason is that when the exciting force is increased, the bonding effect of the bonding surface is made closer, and the ability to resist deformation becomes large, so the contact rigidity is increased. As the exciting force is increased, the micro-protrusions on the contact surface are deformed, the distance between the two bonding faces is narrowed and the gap becomes smaller, then the energy dissipation becomes slower, so the damping is reduced.
4.2.3 Effect of lubrication on normal contact parameters
Through research, it is found that the main mechanism of lubrication for texture reduction in friction and wear. The specific process is that lubricating oil is added to the surface so that the grooves and micro-pit textures can be stored lubricating oil, supplement the oil-deficient contact area, and when the lubricating oil is changed, it is entangled by dynamic pressure lubrication. Therefore, the lubrication is used as an experimental condition to analyze the influence of the texture on the contact stiffness of the joint surface with or without lubrication in the paper.
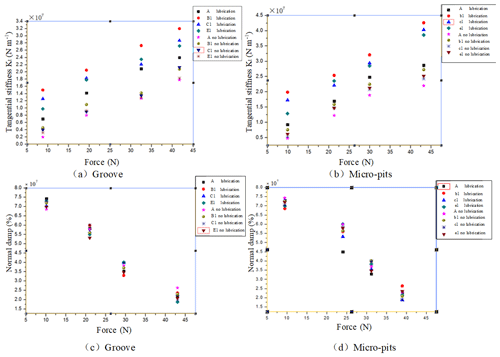
Figure 19(a, b) The impact of lubrication on the normal stiffness (groove and micro-pits). (c, d) The impact of lubrication on the normal damp (groove and micro-pits).
Figure 19 is shown the relationship between the contact stiffness and the excitation force of the groove texture and micro-pit texture under the condition of lubrication and no lubrication. The test piece joint surface is marked in the above figure. The contact stiffness with the change trend of the exciting force can be seen: the contact stiffness is increased with the increase of the exciting force, because the height of the microscopic protrusion on the surface of the bonding surface is not uniform, and the exciting force is smaller. The number of micro-protrusions in contact with the contact surface is smaller. As the exciting force is increased, the number of contact micro-protrusions gradually is increased, and the ability to resist deformation is increased, so the contact stiffness is increased. The analysis of the above reveals that the presence of lubricating oil has a significant effect on the increase in contact stiffness compared to the surface without the addition of lubricating oil. The reason is that the micro-texture of the surface of the bonding surface can be stored a certain amount of lubricating oil, filling the gap at the time of surface contact, and forming an oil film contact area capable of resisting contact deformation to bear the pressure of the contact surface portion.
Comparing the contact stiffness of the grooved textured contact surface with the contact surface with micro-pit texture as a function of the exciting force, it can be found that the micro-pit texture is bonded to the joint surface in the presence of lubricating oil. The contact stiffness is increased by a higher degree than the groove texture, because the lubricating oil stored in the micro-pits is not easily lost, and the groove texture is not closed due to the two ends, and the lubricating oil may be lost as the groove width is increased. The effect on the contact stiffness is reduced, and the micro-pits do not. In general, whether it is groove texture or micro-pit texture, the contact stiffness is significantly improved when there is lubricating oil.
Theoretical analysis is shown that the contact area of the bonding surface is reduced with the increase of the surface texture, so that the number of microscopic protrusions of the bonding surface is reduced, the energy dissipation is faster, and the contact damping is increased. However, this effect was not found in the experiment. The analysis may be that although the number of micro-protrusions on the bonding surface is reduced, the contact pressure of the contact surface is increased at the same time, and there is coupling between the two. Therefore, the influence of texture on contact damping is not obvious. In general, the contact damping decreases as the exciting force of the bonding surface is increased, and the presence or absence of lubricating oil between the bonding surfaces does not significantly affect the contact damping.
4.3 Influence of surface texture on tangential contact parameters
4.3.1 Influence of texture and exciting force on tangential contact parameters
Figure 20 is shown that the tangential stiffness of the contact interface is changed under different load conditions when the test piece of the groove texture, the micro-pit texture and the smooth test piece are in contact.
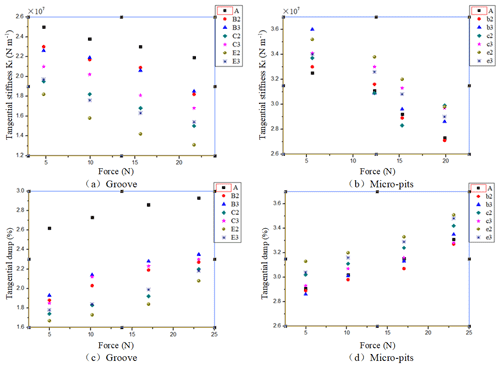
Figure 20(a, b) The impact of texture on the tangential stiffness (groove and micro-pits). (c, d) The impact of texture on the tangential damp (groove and micro-pits).
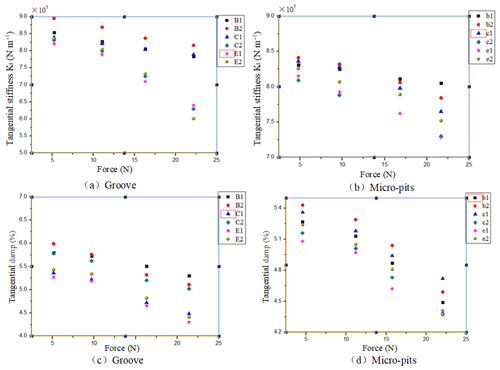
Figure 21(a, b) The impact of exciting force on the tangential stiffness (groove and micro-pits). (c, d) The impact of exciting force on the tangential damp (groove and micro-pits).
Firstly, it can be seen from Figs. 20 and 21 that the tangential contact stiffness is significantly reduced with the increase of the tangential excitation force, whether it is a smooth test piece or a textured sample. And the tangential contact damping is getting bigger and bigger. Because this paper aims to measure the stiffness and damping of the contact joint surface, the set excitation force is relatively small, and there is no degree of slippage. Then, as the exciting force increases, the contact stiffness of the tangential joint surface becomes smaller and smaller. This is also a reasonable matter. The greater the excitation force, the smaller the applied excitation force for the tangential joint, the more likely it is that a larger joint deformation will be obtained. The reason is that even without a smooth surface without texture, there are still many tiny protrusions, and the tangential joint surface is such that the microscopic small protrusions between the surfaces are combined with each other to resist the tangential shear deformation. Therefore, the greater the tangential excitation force, this combination is the more unfavorable. The microscopic small bulges that are combined with each other are less and less, so the ability to withstand the exciting force is smaller. Therefore, as the tangential excitation force is increased, the tangential contact stiffness becomes smaller and smaller.
The relationship between the contact damping condition of the tangential joint surface and the exciting force is opposite to the normal result. The greater the tangential excitation force, the more unfavorable the combination of the micro-protrusions between the bonding faces. Energy dissipation is easier, so the tangential contact damping is increased with the increase of excitation force.
Secondly, the above figure is shown that the textured surface contact stiffness is significantly lower than that of the untextured smooth surface. Moreover, as the proportion of the convex area of the texture to the total area decreases, this trend becomes more and more obvious. Since the texture is machined on the tangential joint surface, for such a joint surface, some voids appear in the contact surface, so that the actual contact area is reduced, so that its actual load bearing capacity is lowered, and the tangential contact stiffness of the joint surface is lowered. As this ratio becomes smaller and smaller, the contact stiffness becomes smaller and smaller.
The analysis of the above experimental results is shown that the greater the exciting force, the smaller the tangential contact stiffness. The existence of the texture weakens the tangential contact, and the proportion of the convex portion to the total area is getting smaller and smaller, and the trend is more obvious. Therefore, an increase in the exciting force and an increase in the texture size are disadvantageous in improving the contact rigidity of the bonding face.
4.3.2 Effect of lubrication on tangential contact parameters
In order to compare the tangential contact stiffness and contact damping in the case of lubrication and no lubrication, the change of contact surface contact stiffness and contact damping under the condition of lubrication is obtained, as shown in Fig. 22. It is shown whether there is lubrication between the joint surfaces of the test pieces, and the lubricated and non-lubricated textured test pieces are respectively subjected to contact experiments with the non-textured test pieces.
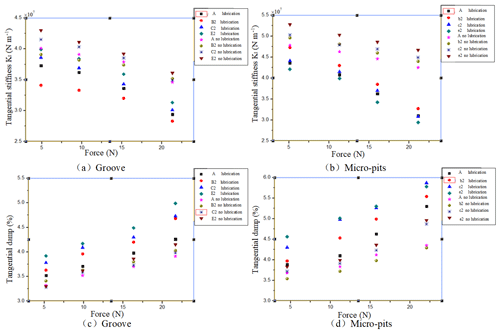
Figure 22(a, b) The impact of lubrication on the tangential stiffness (groove and micro-pits). (c, d) The impact of lubrication on the tangential damp (groove and micro-pits).
As can be seen from Fig. 22, contrary to the experimental results of the normal contact stiffness, the contact stiffness for the tangential contact stiffness is reduced due to the presence of a lubricant. It is believed that the presence of lubricants is to reduce the tangential contact stiffness because the effects of the lubricant are different for extrusion and shear. Lubricating oil is to fill the gaps in the contact surface and is to increase the pressure resistance of the contact surface because the lubricating oil shares part of the pressure and deformation. For the tangential contact interface, in the case of dry contact, the microscopic small protrusions before the contact surface “hook” each other to resist shearing. The surface of the bump with an oil film is covered by the presence of lubricating oil, which makes the surface “slip”. The protrusions before the two surfaces do not compress and bond with each other very well, so the shear resistance is lowered.
First of all, it can be seen from the above figure that the tangential contact damping increases with the increase of the exciting force, which is contrary to the tangential contact stiffness. For normal contact, the greater the excitation force, the better the contact between the bonding surfaces, the more unfavorable the dissipation of energy. The relationship between the tangential contact damping and the exciting force in this section is opposite to that of the normal contact. The greater the tangential excitation force, the more unfavorable the combination of the surface micro-protrusions seen on the bonding surface, and the easier the energy dissipation. Therefore, the greater the tangential excitation force, the greater the tangential contact damping.
In addition, the analysis revealed that the tangential damping of the textured specimens was greater than that of the non-textured specimens, with or without lubrication. Moreover, the smaller the ratio of the projections to the total area, the greater the contact damping. Since the existence of the texture is a decrease in the contact area between the bonding faces, the tightness between the contact faces is reduced, and the energy is more easily dissipated, so the greater the tangential damping of the bonding faces.
This paper mainly studied the surface texture effect combined with the surface contact parameters. The joint surface contact stiffness model considering the domain expansion factor was established. And the influence of texture on the contact stiffness and contact damping of the joint surface was studied in detail by measuring the texture effects of the two different contact interface parameters in the normal and tangential directions. All the research on the joint surface lead to the conclusions as follows.
-
The normal contact stiffness of the joint surface is a function of the normal load P acting on the joint surface, and there is a strong nonlinear relationship between them, especially under a rougher joint surface. Increasing the normal load between the joint surfaces can increase the normal contact stiffness of the joint surface. When the fractal dimension D=1.1–1.7, where the parameters of the joint surface material are 1.0, 0.1 and 0.01 respectively, the normal contact stiffness of the joint surface increases with the increasing fractal dimension D of the joint surface. However, when D>1.7, the normal contact stiffness of the joint surface decreases as the joint surface fractal dimension D increases. In addition, the stiffness of the joint surface decreases with the increase of the scale parameter G, increases with the increase of k (the ratio of the hardness of the material to the yield strength) and the material properties ϕ. The variation of the tangential contact stiffness to the normal load, fractal dimension parameters and material property parameters is similar to that of the normal contact stiffness.
-
Through a large number of experiments, the influence of the texture size and of lubricating oil on contact stiffness and on contact damping were obtained. Firstly, as the normal excitation force increases, the contact stiffness and the contact damping become smaller and smaller. Secondly, the experimental results show that the greater the roughness of the contact bonding surface, the smaller the contact stiffness value. Thirdly, the influence of the texture on the contact stiffness are as follows: as the actual contact area decreases, the contact stiffness decreases as well. Fourthly, the lubricating oil fills the gap of the contact surface and shares the pressure, which improves the contact stiffness.
-
The texture effect of tangential contact parameters was experimentally analyzed. As the tangential excitation force increases, the tangential contact stiffness decreases and the contact damping increases for the reason that the tangential contact bonding surface resists the tangential force by mutual squeezing and “hooking” between the microscopic small protrusions of the contact surface. The greater the tangential excitation force, the less the number of hooks and more unfavorable the combination of the surface. Meanwhile, the energy dissipation increases, so the stiffness reduces and the damping increases. Both texture and lubricants can increase tangential contact damping because of accelerate energy dissipation.
| The dimensionless true contact area | PePp | The normal elastic contact load, the normal plastic contact load, respectively. | |
| D | The fractal dimension | ϕ | The material parameters |
| n(a′)n(a) | The size distribution function of the contact point | P∗ | the dimensionless normal total load acting on the joint surface |
| ψ | The domain expansion factor of the micro-contact size distribution | μ | The friction coefficient of the two contact materials of the bonding surface |
| al, | The micro-contact cross-sectional area, the cross-sectional area of the largest contact point respectively | v | The Poisson's ratio of the two contact materials of the bonding surface |
| E1E2 | The elastic moduli of the two elastomers | The equivalent shear modulus of the two contact materials of the bonding surface | |
| p | The normal load | TμT | The tangential force on the unit contact area, the tangential force acting on the entire joint surface, respectively |
| r | The radius of the contact area | The tangential contact stiffness of the joint surface | |
| δ | The normal contact deformation | kt | The tangential contact stiffness of the single micro-protrusion |
| kn | The tangential contact stiffness of the single micro-protrusion | σy | The yield strength of the softer material |
| Kn | The normal contact stiffness of the joint surface | H | The hardness of the softer material |
| G∗ | The dimensionless feature length scale parameter | t | The tangential force acting on the contact area a |
All data included in this study are available upon request by contact with the corresponding author.
CZ has made substantial contributions to the conception and design of the work, the acquisition, analysis and the interpretation of data for the work. And she has drafted the work or revised it critically for important intellectual content. ZY has made a contribution to the acquisition of simulation experimental data and data collation.
The authors declare that they have no conflict of interest.
This work was supported by the Talent Project of Revitalizing Liaoning (Grant No. XLYC1807065) and the Project of Shenyang High Level Innovative Talents (Grant No. RC180193).
This research has been supported by the National Natural Science Foundation of China (grant no. 51575365) and the Natural Scientific Foundation of Liaoning Province (grant no. 2015020127).
This paper was edited by Xichun Luo and reviewed by two anonymous referees.
Abad, J., Franco, J. M., Celorrio, R., and Lezáun, L.: Design of experiments and energy dissipation analysis for a contact mechanics 3D model of frictional bolted lap joints, Adv. Eng. Softw., 45, 42–53, https://doi.org/10.1016/j.advengsoft.2011.09.021, 2012.
Andrew, C., Cockburn, J. A., and Waring, A. E.: Metal Surfaces in Contact under Normal Forces: Some Dynamic Stiffness and Damping Characteristics, in: Proceedings of the Institution of Mechanical Engineers, Conference Proceedings, 182, 92–100, https://doi.org/10.1243/pime_conf_1967_182_307_02, 2010.
Arghir, M., Billy, F., Pineau, G., Frěne, J., and Texier, A.: Theoretical Analysis of Textured “Damper” Annular Seals, J. Tribol., 129, 343–354, https://doi.org/10.1115/1.2738072, 2007.
Bechert, D. W., Bruse, M., and Hage, W.: Experiments with three-dimensional riblets as an idealized model of shark skin, Exp. Fluids, 28, 403–412, https://doi.org/10.1007/s003480050400, 2000.
Blossey, R.: Self-Cleaning Surfaces–Virtual Realities, Nature Mater., 2, 301–306, https://doi.org/10.1038/nmat856, 2003.
Bruzzone, A. A. G., Costa, H. L., Lonardo, P. M., and Lucca, D. A.: Advances in engineered surfaces for functional performance, CIRP Annals – Manufacturing Technology, 57, 750–769, https://doi.org/10.1016/j.cirp.2008.09.003, 2008.
Buczek, P., Ernst, A., and Sandratskii, L. M.: Interface electronic complexes and landau damping of magnons in ultrathin magnets, Phys. Rev. Lett., 106, 157204.1–157204.4, https://doi.org/10.1103/PhysRevLett.106.157204, 2011.
Eisenstein, D. J., Weinberg, D. H., Agol, E., Aihara, H., Allende Prieto, C., Anderson, S. F., et al.: SDSS-III: Massive spectroscopic surveys of the distant Universe, the MILKY WAY, and extra-solar planetary systems, Astron. J., 142, 725–735, https://doi.org/10.1088/0004-6256/142/3/72, 2011.
Etsion, I.: Improving tribological performance of mechanical components by laser surface texturing, Tribol. Lett., 17, 733–737, https://doi.org/10.1007/s11249-004-8081-1, 2004.
Fang, Y., Sun, G., Cong, Q., Chen, G. H., and Ren, L. Q.: Effects of Methanol on Wettability of the Non-Smooth Surface on Butterfly Wing, J. Bionic Eng., 5, 127–133, https://doi.org/10.1016/S1672-6529(08)60016-5, 2008.
Flores, P., Ambrósio, J., Claro, J. C. P., Lankarani, H. M., and Koshy, C. S.: A study on dynamics of mechanical systems including joints with clearance and lubrication, Mech. Mach. Theory, 41, 247–261, https://doi.org/10.1016/j.mechmachtheory.2005.10.002, 2006.
Fu, W. P., Huang, Y. M., Zhang, X. L., and Guo, Q.: Experimental Investigation of Dynamic Normal Characteristics of Machined Joint Surfaces, J. Vib. Acoust., 122, 393, https://doi.org/10.1115/1.1287589, 2002.
Greenwood, J. A. and Williamson, J. B. P.: Contact of Nominally Flat Surfaces, P. R. Soc. Lon. Ser. A, 295, 300–319, 1996.
Hoffmann, N. and Gaul, L.: Effects of damping on mode-coupling instability in friction induced oscillations, Zeitschrift fur Angewandte Mathematik und Mechanik, 83, 524–534, https://doi.org/10.1002/zamm.200310022, 2003.
Jackson, R. L.: The effect of scale-dependent hardness on elasto-plastic asperity contact between rough surfaces, Tribol. Trans., 49, 135–150, https://doi.org/10.1080/05698190500544254, 2006.
Jaumouillé, V., Sinou, J. J., and Petitjean, B.: An adaptive harmonic balance method for predicting the nonlinear dynamic responses of mechanical systems – Application to bolted structures, J. Sound Vib., 329, 4048–4067, https://doi.org/10.1016/j.jsv.2010.04.008, 2010.
Liang, Y., Chen, W., Bai, Q., Sun, Y., Chen, G., Zhang, Q., and Sun, Y.: Design and dynamic optimization of an ultraprecision diamond flycutting machine tool for large KDP crystal machining, Int. J. Adv. Manu. Technol., 69, 237–244, https://doi.org/10.1007/s00170-013-5020-z, 2013.
Ma, J. F., Li, Q., Wu, L. S., and Qu, C. N.: Research on the Static and Dynamic Characteristics of the Sliding Rail Joint Surfaces of the Fe-Based Porous Oily Material, Appl. Mech. Mater., 607, 422–426, https://doi.org/10.4028/www.scientific.net/amm.607.422, 2014.
Majumdar, A. and Bhushan, B.: Fractal Model of Elastic- Plastic Contact between Rough Surfaces, J. Tribol., 113, 1–11, https://doi.org/10.1115/1.2920588, 1991.
Mao, K., Li, B., Wu, J., and Shao, X.: Stiffness influential factors-based dynamic modeling and its parameter identification method of fixed joints in machine tools, International Journal of Machine Tools and Manufacture, 50, 156–164, https://doi.org/10.1016/j.ijmachtools.2009.10.017, 2010.
Mi, L., Yin, G. F., Sun, M. N., and Wang, X. H.: Effects of preloads on joints on dynamic stiffness of a whole machine tool structure, J. Mech. Sci. Technol., 26, 495–508, https://doi.org/10.1007/s12206-011-1033-4, 2012.
Pecorari, C. and Rokhlin, S. I.: Elasto-plastic micromechanical model for determination of dynamic stiffness and real contact area from ultrasonic measurements, Wear, 262, 905–913, https://doi.org/10.1016/j.wear.2006.08.018, 2007.
Pettersson, U. and Jacobson, S.: Influence of surface texture on boundary lubricated sliding contacts, Tribol. Int., 36, 857–864, https://doi.org/10.1016/S0301-679X(03)00104-X, 2003.
Shafiei, M. and Alpas, A. T.: Nanocrystalline nickel films with lotus leaf texture for superhydrophobic and low friction surfaces, Appl. Surf. Sci., 256, 710–719, https://doi.org/10.1016/j.apsusc.2009.08.047, 2009.
Smallwood, D. O., Gregory, D. L., and Coleman, R. G.: Damping investigations of a simplified frictional shear joint, Office of Scientific & Technical Information Technical Reports, XII, 67–83, https://doi.org/10.1080/00856408908723119, 2000.
Wang, R., Zhu, L., and Zhu, C.: Research on fractal model of normal contact stiffness for mechanical joint considering asperity interaction, International J. Mech. Sci., 134, 357–369, https://doi.org/10.1016/j.ijmecsci.2017.10.019, 2017.
Zhang, W. M., Meng, G., and Wei, K. X.: Numerical Prediction of Surface Roughness Effect on Slip Flow in Gas-Lubricated Journal Microbearings, Tribol. Trans., 55, 71–76, https://doi.org/10.1080/10402004.2011.599510, 2012.
Zhao, Y. and Bai, Z. F.: Dynamics analysis of space robot manipulator with joint clearance, Acta Astronaut., 68, 1147–1155, https://doi.org/10.1016/j.actaastro.2010.10.004, 2011.
- Abstract
- Introduction
- Fractal model and numerical simulation of contact stiffness of the binding surface considering domain spreading factor
- Measurement experiment of combined surface contact parameters
- Analysis of the influence of surface texture on contact parameters
- Conclusion
- Appendix A: Nomenclature
- Data availability
- Author contributions
- Competing interests
- Acknowledgements
- Financial support
- Review statement
- References


